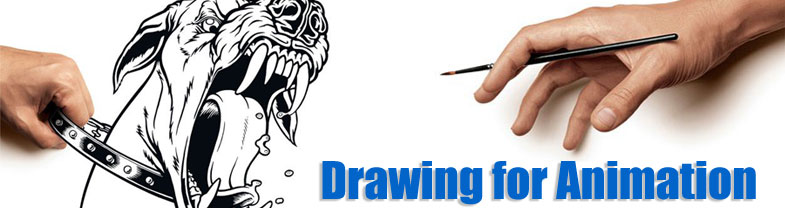
Drawing for Animation
When I started my own studies in animation several years ago, I did not start with Disney or Warner Brothers. I started with Jurassic Park (the first one); I was dazzled by the computer animation which looked so real! I decided that I would learn as much about computer animation as possible. I am fairly good on the computer; I assumed that I would just need a few programs, some tutorial books and I could start making episodes 7, 8 and 9 of Star Wars.
Well, not quite. You see, within a few days, after looking around on the Internet, I discovered that the first piece of advice that computer animators gave out was learn how to animate with a pencil. And guess what advice those low-tech, pencil animators gave out was. LEARN HOW TO DRAW!
I don't care if you want to work at Pixar or Warner Brothers; for any animation or animation-related job, you must still learn how to draw.
What you'll need
Not much. ONE big sketch book, to start with. MANY soft pencils (H-3B will do fine, but most people prefer to start with 2B's). A FAIR AMOUNT of time. ONE lock on your door to keep annoying siblings out. And a BIG imagination.
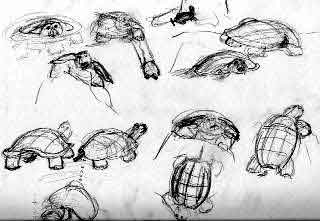
After the second exercise, a live model becomes an amazing asset. How will you learn to draw people if you don't draw people? If you can't afford a model, either ask a friend, or try to find a substitute like a good statue. Best of all, take a life drawing class, where you have professional models and art teachers too. Remember, though - you can always draw people on the street, on the bus - they won't know or care.
I am not by any stretch of the imagination (I'm sure I've said this before!) a professional or master artist. But some of the exercises which are helping me may also be of help to you. Click here to start. Good luck, and happy drawing.
Drawing Lessons #1: Draw what you See
The biggest problem that artists must overcome is not one of technique or of inspiration. The biggest problem is the lack of seeing. When people go through their lives every day, they do not see. They look. There is a very simple reason for this; no-one could possibly notice every detail in the world around us. So the brain filters out the details for us. When you are walking down the street, you see the street, the sidewalk, the other people, and the buildings. You do not notice the cracks in the sidewalk or the weeds growing in those cracks; the quality of the pavement or the type of cars on the street; the expressions of the faces of the people around you; the texture of the bricks on the buildings you pass. All of these things will have an impact on you, but mainly on a subconscious level.
The part of the brain responsible for this filtering is the left side of the brain (all those who have read "Drawing on the Right Side of the Brain, please skip to the first exercise). It replaces the bricks in the building with the word "wall", the vintage Model T with the word "car". But when you actually start to notice and observe what is around you, you can force another part of your brain into action; the right side.
The right side of the brain is what controls your unconscious, your instincts. Talking is a right brain function; when you talk you do not think in terms of article - subject - preposition - adjective - adverb - descriptive verb. However, when most people draw, this is exactly how they think. To draw a person, you draw a head, a body, two arms and two legs, the hands, the feet, the hair, and the clothes. But, you are not actually drawing legs, arms, heads, etc. You are simply drawing "symbols" that you have learnt for these things. A leg is two long straight lines, sometimes bent a bit. A head is an elongated circle. In short, you are drawing what you think these things are, not what they are.
I will for now omit the further explanations of how and why this
happens, but all serious art students should read about how the brain
works in the marvelous book, The New Drawing on the Right Side of the Brain: A Course in Enhancing Creativity and Artistic Confidence
.
For now we will concentrate on the exercises that will remove drawing
from the left side of the brain and shift it to the right.
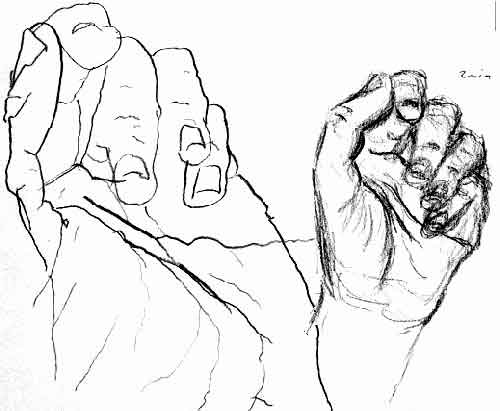
Okay, the torture's over. Relax your hands, and note the interesting blue colour underneath the fingernails. After you havemassaged them back to a more normal colour, you may now look at your drawing. Ahhhhh! It looks awful! Well, don't worry, that's normal. You see, the point of this exercise is not to make a beautiful work of art (although that is rare but pleasant side effect). The point is to stop using those symbols I was rambling on about a few paragraphs ago. If you can't see what you're drawing, it's a lot harder to draw an ellipse. And by forcing yourself to draw slowly, you will start to observe details you never saw before. The indentations in the skin of the knuckle. The irregular folds of flesh of the hand. The webbing between the thumb and palm.
While pure contour drawing has no direct link to animation, "normal" contour drawing does. All cleanups are essentially contour drawings; they are drawing slowly and painstakingly, just like the one you just did. Check out the example in the margin of Pocahontas to see what I mean - the cleanup probably took about 4-5 hours.
| A patience exercise: Find a place where you can work undisturbed for half an hour. Place your sketch book open on a table on your right hand side, preferably tilted towards you. Hold your pencil lightly in your right hand, and place it roughly in the middle of your paper. Now, turn in your chair until you are looking in the opposite direction of your paper. Your right hand, the pencil and the paper are now behind you. Place your left hand on your knee and relax. VERY SLOWLY, start to trace the contours of your hand. UNDER NO CIRCUMSTANCES LOOK AT YOUR PAPER! Draw everything you see. Do not attempt to name something (like a fingernail) and then draw it, because you cannot see the paper you are drawing it onto. Just "trace," as accurately as you can, the contours of that thing (which just so happens to be a fingernail).You should start by drawing for about 15 minutes at a time (use a timer!), and gradually work up to anywhere from 1/2 hour to 2 hours per hand. After you have been doing this exercise for several weeks, you may look at the paper occasionally to reposition your pencil. But do not move the pencil until you are again looking away. |
Drawing Lessons #2: Draw what you Feel
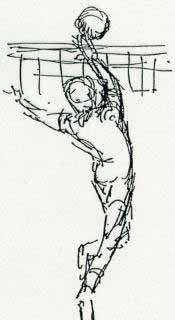
You have survived - intact - the rigors of contour drawing. Now the fun begins. We will learn a technique called gesture drawing.
With contour drawing, the name of the game was detail. Now, the game has changed; it's called structural movement, which means, oddly enough, movement of the structure. This name is a bit deceptive as it implies that there is physical motion; in reality, this motion is imagined. Does a flower have structural movement? Sure it does. If I put my pencil near the bottom of the page and try to draw a rose, my pencil will be drawn, almost on it's own, to the petals of the flower. Once there, the line will shoot out to the tip, only to fall again to the centre, and re-emerge on the other side of the petal. It's simply following the structural movement of the flower. Once again, you'll understand what I mean after you've done it yourself.
A gesture drawing does not show the surface details of an object, rather the forces that are contained within that object. Like contour drawing, it involves an almost complete loss of conscious thought and allows you simply to react to what you see. Okay, I'm starting to feel like I've rambled enough. Time for an exercise.
Drawing exercise - Take any complicated object. A live model (clothed or nude) is best, but a flower, plant, pet, ribbon, or any other organically shaped object should do fine. (I would not recommend using your hand this time, as gesture drawing is very physical and involves the whole upper body and you will not be able to keep your hand still). Set your timer to 15 seconds. Yup, you heard right. You've got 15 seconds to draw the object in front of you. After the time is up, move the object or get the model to change poses. Repeat a minimum of ten times. Now set your timer to 30 seconds and repeat 5-10 times. Now set it to two minutes and repeat about five-ten times. Note that your drawing speed should NOT CHANGE; when you have 2 minutes you should draw like you have fifteen seconds.
And truthfully, that's all there is to gesture drawing. But there are some 'tricks' you can use to make your drawings more dimensional and lifelike:
- Directional Lines:
- Imagine that every cylindrical part of the body (arms, torso, legs, even the head) is covered by circular lines. These lines wrap around the body like a mummy. If you draw these lines, you will automatically gain a better sense of space. (If you are using a flower, these lines would wrap around the stem and would loosely enclose the flower itself)
- Centre of Movement:
- If a person is sitting, the centre of movement is the torso. If the model is crouching, the centre is in between the two feet; if (s)he is hanging, it's in the arms. This strategy does not always work, but is worth experimenting with.
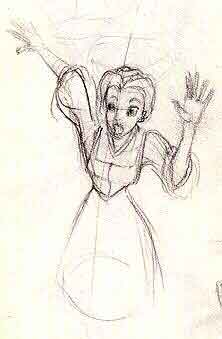
So what does this have to do with animation? Many animation roughs look like gesture drawings on steroids. Some of the most amazing gesture drawings are those by Glen Keane (in the margin). The main difference is that an animation rough must ALWAYS be to proportion - a gesture drawing does not.
Drawing Lessons #3: The Human Figure (1)
So, we've drawn contour drawings for hours, and gesture drawings for seconds. The results of these exercises are not supposed to look "real". But, when we're talking about drawings, what is real anyways? The drawing is a flat page, so "real" can't mean 3-d. A colour photograph looks real, but we're not using colours (yet). The first thing that makes a pencil, charcoal or conte drawing look real is PROPORTIONS.
| Exercise:
Pick a point on or near the model (say the tip of his index finger).
Then pick another point (say the tip of his nose). Draw a single dot on
the paper - that is the tip of the finger. Now, using your pencil at
arms length in front of you, measure the angle between the finger and
the nose. Without bending your elbow or wrist, bring your arm down to
the paper until the bottom of the pencil is touching the point. Pick
any point along the resulting line - that is now the tip of the nose.
These two points will determine the size of your entire picture. Now pick another point - say, the model's elbow. Measure the angle from finger to elbow as before, but instead of marking a point, trace a line. Now, measure the angle from the nose to the elbow. Trace that line. The intersection of the two lines is the position of the elbow. Bingo! Now repeat this for the other 5000 body parts you can see. Good luck! |
Now, there are several ways to go about getting accurate proportions into your drawings. You know how in movies, artists are always sticking their pencils out in front of them to measure distances? Well, although artists do that, occasionally, a far better use of the pencil is not to measure distances, but to measure angles. There are several reasons for this: if you move your hand even slightly closer or farther away from you between the time than you measure the object and the time that you draw it, the proportions could go wildly off. You can only draw the model "life size" - that is, the size at which you perceive him/her. And then there is the fact that we are trying to draw poses, and a munchkin can usually attain the same pose as a basketball player, even though he is a fraction of the size of the basketball player. What the munchkin and Micheal Jordan will have in common is the angles at which the different parts of their bodies relate to each other.
So, read the above and do the exercise. Contour drawing is starting to look exiting. Surely this isn't what animators do? Of course not, but it is a useful exercise to get you thinking about proportions. By the way, this is a sort of drawing which combines left and right brain functions - the right brain does the angles, the left checks to make sure they're right (no pun).
See what you can do with the previous three exercises. Why don't you measure out the proportions of the figure, using maybe 5 points (hands, feet, head). Then do a 2 minute gesture drawing, but trying to stay roughly within the confines of the five points. Darken in the best outlines of the figure, noting both the five points and your gesture drawing. Finally, do a contour drawing, but look down and the page from time to time, making sure that you stay on the rough outline that you've already drawn.
Now, if you're smart (and I know you are), you'll have noticed that this exercise doesn't really have much to do with the human figure in particular. Does this mean I've just been blabbing away at my keyboard for no real reason? Well, yes, but this is also intended as another way of getting you to think about the figure. When we next revisit the human figure, we'll start to study a bit of anatomy.
Drawing Lessons #4: Exercises
Nope, not real exercise - those are for your model (at least in exercise 4!). Keeping fit is your own business; for now, check out these exercises. Some I made up; others (where listed) come from a book.
The One Minute Character Sketch
Pick a character, any character. Now pick and emotion, or an action (eg happy, excited, angry, fearful; walking, talking, exploring). Set your timer to beep every minute. Now, every minute, make one full-bodied (no close-ups) drawing of your character in whatever emotion or motion you have chosen. Keep going as long as you can. I generally run out of ideas at about the 30 sketch mark; if that happens, take a break and try again later. This exercise teaches you about staging (composition), as well as expression emotions with the full body (as there is not enough time to draw the face). I recommend one hour of this exercise, with breaks every 20 minutes or half hour (use another timer to time that).
Source: Animation: From Script to Screen
Cafe Drawing
THIS IS IMPORTANT!!!!!!
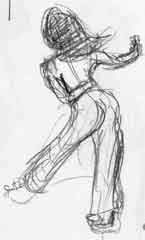
Also known as the flash pose, this simply involves drawing anyone or anything around you. In the case of the drawings on the left, I was getting bored at a rehersal so I simply started to draw the people around me - in this case, a girl practicing a dance from "Jesus Christ Superstar". This exercise is where you learn to draw FAST because you never know when people will move, or people may be moving already. The drawing is not quite a pure gesture because, to a certain extent, you are trying to get a rough likeness, but the style of drawing is definitely very gestural.
The One Minute Movie Sketch
This exercise requires a VCR with freeze-frame; that is, when you push the "Pause" button the picture should be clear with no fuzzy lines. Put in a movie - any movie, animated or not - and start watching it. Set your timer to beep every minute, like you did with the 1-minute character sketch. Start your timer. When the timer first beeps, pause the film. Now, draw - either the entire scene, or just one character in the scene. When the timer next beeps, resume the movie. Repeate as often as you wish. This exercise will increase your awarness of staging and action.
I developed this exercise on my own, and then learnt about six months later that it is actually taught at Sheridan and other art colleges. So I guess this one works after all!
The Moving Pose
This rather interesting exercise is an obvious extension of the gesture drawing for the animation student. This exercise requires the use of a model (actually, a model exercising would be ideal). The model picks an action which he or she either repeats or which is a cyclic action (walking on a treadmill, using a NordicTrak, using a stationary bike). I have even drawn other people drawing other people. You now start to draw the entire action on the same spot on the page. Usually you will start with the part of the model that is the most stationary and move out to the parts with the most movement. This exercise can be as long or as short as you wish.
When you feel you have mastered this try seperating the poses. Decide, for instance, that you will draw five distinct poses. Using a BIG sheet of paper, start to draw five different stages of the action. Do not complete one before moving on to the other, rather, work on all five at the same time, just like in the exercise above. When you're finished, you should be able to seperate the poses, feed them into a pencil tester and see the original movement once again.
Source: The Natural Way to Draw: A Working Plan for Art Study
Remember: none of these necessarily need to be done with a nude model!
Drawing Lessons #5: The Human Figure (2)
Anatomy
Welcome to our continuing lessons into anatomy. If you are looking for detailed, concise, clear and accurate descriptions of human anatomy, then you have come to the wrong place. These pages will only give you the briefest of introductions to the human figure and what's going on under the skin. The diagrams are not anatomically correct, but they are useful in that they will give you something to look for while you are drawing a person.
The Trunk
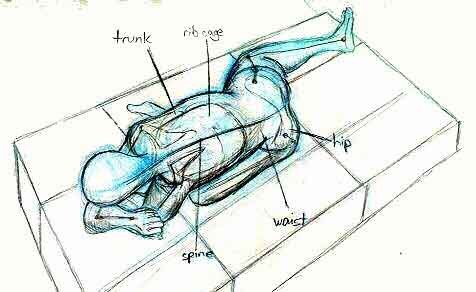
For starters, let's look at Eden, lying on the floor. Now, this looks like a fairly simple, easy pose to analyse and draw. It's not. Your first impluse, upon seeing this, would probably be to draw a large rectangle to represent her trunk. This is the worst possible thing you could do. First of all, let's look at these pictures more closely.
You will see, coming out of the bottom of her swim suit, a dark streak going down the middle of her back with alternating light and dark patches (which did not survive the JPEG compression very well). This streak is her spinal chord, or backbone. It is what holds the body together. It is NOT the line of action, which flows through the whole body, rather, it only flows from the hip bone to the base of the skull. Nevertheless, the two often coincide, and at the very least the spine is an indicator of what the line of action should look like. So, when I began to draw this 'illustration', the first thing I did was to draw the line of action along the spine. You will notice that I made the angle a little shallow, and so the entire picture looks like it was taken at a slightly different angle - while this was a mistake, it shows how the body must follow this first line. So: Drawing rule: look for the spine, and use it to find the line of action.
In this same closeup, you should notice that the back is not, as you might initially have thought, one big rectangle. There are two very dark lines that point towards the base of the spine. This is actually the waist, the thinnest point on the trunk (for both men and women). Now, these two lines are visible because her hip is bent away from her upper back. This is easily seen by comparing the directional lines of the bottom of her 'bra' and the top of her swimsuit. In my drawing, I drew the directional lines all around her trunk, noting the change of direction at the waist. Then, as I drew the contour lines of her back, I let them dip in, roughly following the directional lines. These overlapping lines give the illusion of depth, and are very important. Remember: Contour lines are only visible directional lines.
Discussion
The question now arises: why is the waist the thinnest part of the body? If you look at the drawing above, it becomes clear. Above the waist, there is the rib cage. Below, there is the hip bone. Both are made of hard bone. In the waist, however, there is nothing; this is where the spine bends. As there are no bones holding the flesh out, if you are thin enough it will "sag" (for lack of a better word) back into the body. Women generally have thinner waists then men, both because of an (over?)emphasis on weight loss, reduced muscles and a wider hip bone. I think that it is for this reason that so many artists find women easier to draw than men; the thin waist forms a neat division between the upper and the lower body, and it is far easier to draw to shapes at different angles than one complicated shape that changes angles. If a man were posing in the picture above, those neat inward lines would be much harder to see, if they were at all present; consequently, it would be much harder to draw convincingly.
One last note: in the drawing, you will notice two small triangles at her shoulders. Those are the shoulder blades. I'll talk about those more in a minute - for now, just look at them and remember where they are.
Head and Shoulders
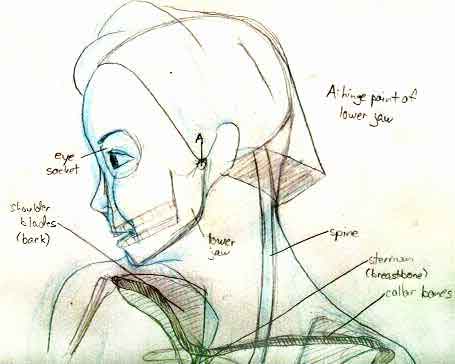
To finish up, let's look at the head, neck and shoulders. Here we have Eden, in profile view. There's not much to say - just observe my notes in the drawing below. Some quick notes. The head is shaped roughly as a flattened ball from the front, and as a rounded square from the sides. The skull is very roughly sketches in here. Notice these things: First of all, when the mouth opens, it swings open from point A, just in front of the ear. Remember to show the entire jaw moving when a character is talking - just opening the mouth will look really weird. The eye is located in a hole in the skull. This hole is much larger than the eye itself. The eybrow is generally located along the top ridge of this hole. The backbone fits into the skull just behind the ears. Notice how the back contour of the head and neck is concave; as with the waist, there is no bone here so the flesh goes inwards. Also like the waist, men generally have less inwards curvature, as many of the back muscles begin in the neck in this area. Supermodels have almost no back muscles (they're called trapezoids) at all, making their necks very thin and giving the illusion of them being very long.
Getting down to the shoulders, you will notice that I have drawn a see-through view; you can see the shoulder blades. In front are the collar bones. Below the collar bones is the breast bone (or sternum). The breast bone holds up the ribs, and forms the main shape of the upper chest (or thorax). For our purposes, the collar bones are far more interesting. You will notice that, at the shoulders, they meet both the arm bones and the shoulder blades. You will also notice that they are reasonably flat, when the shoulders are not being shrugged. The collar bones and the shoulder blades together form something called the pectoral girdle, which I find one of the most usefull structures on the skeleton. Why? Because they are physical directional lines, reaching all the way around the chest! When I am drawing a figure that it even slightly bent towards me, be it from a model or from imagination, the first thing I draw (after the line of action) is the girdle, from which I project the rest of the trunk.
Final notes
OK, I've talked enough and spilt enough of my "secrets". 99% of the things you'll use when drawing, you must discover for yourself - tricks such as the pectoral girdle. You will not find hints like that in books, and I only gave it here as an example. These things you will discover will be your own secrets - the more you have, and the more you practice, the better you'll become. I will write one more anatomy lesson - detailing the limbs - but after that you're on you own.
For more anatomy, hop on over to the goods page and get yourself an anatomy book. That's the best way to learn, unless you feel like attending a dissection. But that's not exactly life drawing, now, is it?
Perspective
"Ahh, why do I have to learn perspective? Don't computers do all that boring stuff now?"
'Friad not. Computers do occasionally generate backgrounds for feature films now (most notable Tarzan) but the majority of backgrounds are still done by hand. And all those backgrounds are based on layouts, and all layout artists must be proficient in perspective. Not to mention that animators to animate on top of CG backgrounds must also know enough perspective to make the character look like they actually exist inside the background.
This is a very quick visual introduction to perspective.
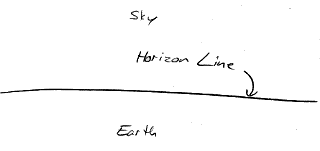
The horizon line is the imaginary line at which the sky hits the sea. It is sometimes but not always visible.
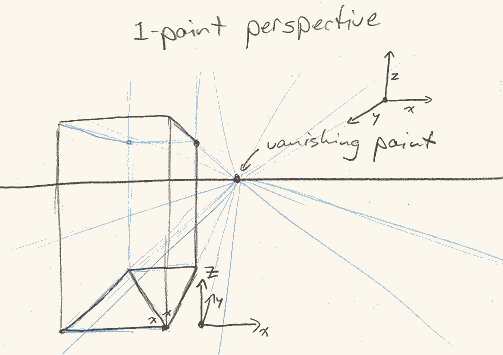
A vanishing point is a point to which straigh edges appear to converge. In 1pt perspective, all y-axis lines converge at a single point on the horizon line.
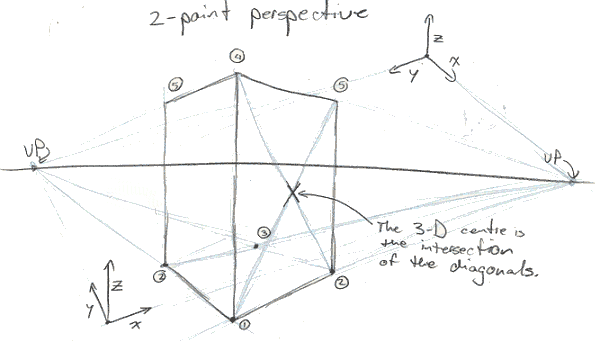
In 2pt perspective, all x-axis lines converge to one VP, and all y-axis lines towards another. Objects appear normal when between the two vanishing points; moving them outside can produce strange distortions.
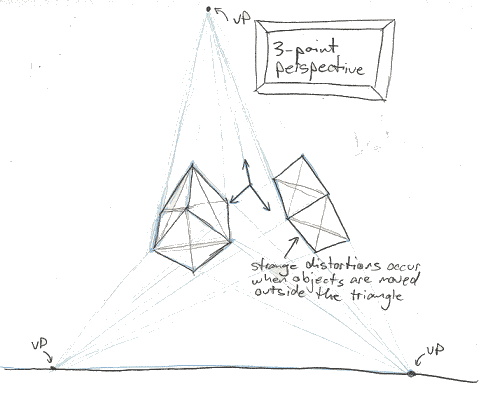
In 3pt perspective, the z-axis lines also converge towards a vanishing point, located off the horizon line.

Irregular shapes, including humans, can easily be drawn within boxes constructed using perspective.
That's all folks!